I was standing in my kitchen last Tuesday, staring down at a sink full of gray, stagnant water and a pile of half-washed dishes, feeling that familiar knot of frustration in my stomach. It’s one of those moments where you just want to call a professional and throw your hands up in the air, isn’t it? But honestly, most people think that learning how to unclog a drain requires expensive, heavy-duty machinery or a massive plumbing bill, and that is a total myth. Growing up in my family’s hardware store, I learned early on that most of these headaches can be solved with a bit of grit, the right basic tools, and a lot of patience.
I’m not here to sell you on some miracle chemical that’s going to eat through your pipes; I want to give you the real deal. In this guide, I’m walking you through my tried-and-true, no-nonsense methods to get things moving again without the stress. We’ll cover everything from the simple manual fixes to the slightly more “get your hands dirty” techniques that actually work. Let’s roll up our sleeves and tackle this together so you can get back to enjoying your beautiful home!
Table of Contents
- Step-by-Step Instructions
- Mastering Plunger Techniques for Sinks and Simple Natural Drain Cleaner Rec
- Cleaning a P Trap and Using a Plumbing Snake for Success
- Pro Tips from My Toolbox: Little Tricks for Big Results
- Quick Wins for a Clear Drain
- A Little Patience Goes a Long Way
- You've Got This: Final Thoughts on a Clear Drain
- Frequently Asked Questions
Guide Overview
Tools & Supplies
- Plunger (cup or flange style for creating suction)
- Drain snake or auger (to reach deeper clogs)
- Baking soda (1/2 cup)
- White vinegar (1/2 cup)
- Boiling water (1 kettle)
Step-by-Step Instructions
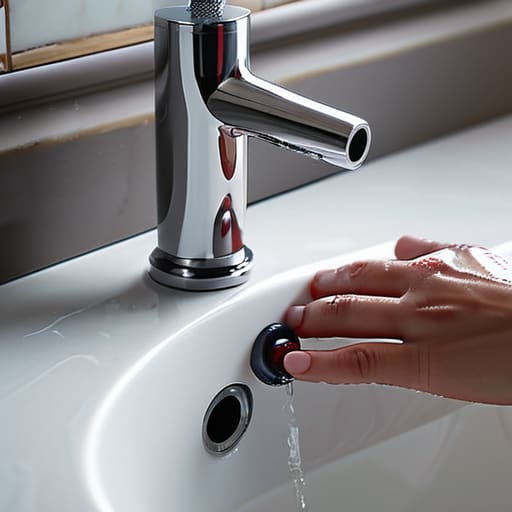
- 1. First things first, let’s grab your trusty plunger. Before you start pumping away, make sure you have a good seal. If you’re working on a sink, try to block the overflow hole with a damp rag; this creates the vacuum pressure you actually need to move that clog. If you don’t seal that little hole, all your hard work is just going to escape through there instead of hitting the blockage!
- 2. Now, it’s time for some elbow grease. Fill the sink with enough water to cover the bell of the plunger, but don’t go overboard—you don’t want it overflowing all over your floor. Place the plunger over the drain and give it a few firm, rhythmic plunges. It might feel a bit tedious, but consistency is really the secret sauce here.
- 3. If the plunger isn’t doing the trick, we might need to get a little more “hands-on” with the P-trap. Pop open your cabinet and place a bucket underneath the U-shaped pipe beneath the sink. Carefully unscrew the slip nuts by hand (or with a wrench if they’re being stubborn), and once that pipe is off, you’ll likely find the culprit hiding inside. It’s a little messy, but seeing exactly what was causing the backup is super satisfying!
- 4. Once you’ve cleared out the physical debris from the trap, give everything a good rinse in a different sink or with a garden hose. Before you put it all back together, take a moment to inspect the washers and seals. Since I grew up in a hardware store, my dad always taught me that a tiny, worn-out washer is the number one cause of a leaky sink later on.
- 5. If you’re dealing with a slower drain rather than a total stoppage, let’s try a gentle, eco-friendly “fizzy” treatment. Pour about half a cup of baking soda down the drain, followed by half a cup of white vinegar. It’ll bubble and hiss—which is honestly one of my favorite parts—and then let it sit for about 15 minutes. It’s a much kinder alternative to those harsh, caustic chemical cleaners that can damage your pipes over time.
- 6. To finish things off, flush the system with a big pot of boiling water. This helps melt away any lingering grease or soap scum that might be clinging to the sides of the pipes. Just a quick heads-up: if you happen to have PVC pipes, use very hot tap water instead of boiling water to be extra safe with the plastic joints!
- 7. Finally, turn on the faucet and let the water run for a few minutes to ensure everything is flowing smoothly. If you hear a clear, steady stream and see no leaks under the sink, you did it! Take a second to celebrate that win—you just tackled a real home maintenance task like a total pro.
Mastering Plunger Techniques for Sinks and Simple Natural Drain Cleaner Rec
If the initial steps didn’t quite do the trick, don’t panic! Sometimes you just need to get a little more strategic with your tools. When it comes to plunger techniques for sinks, remember that a standard cup plunger isn’t always your best friend for smaller basins. If you’re working on a bathroom sink, try using a flat-bottomed plunger and make sure you cover the overflow hole with a damp rag. This creates the necessary suction to really move that blockage. It’s all about creating a tight seal to force the pressure where it needs to go!
If you’re a bit wary of harsh, caustic chemicals that can damage your pipes, I have a few favorite natural drain cleaner recipes that are much gentler on the environment. A classic mix of baking soda and vinegar works wonders for minor buildup. Just pour half a cup of baking soda down, follow it with half a cup of vinegar, and let it fizz away for about fifteen minutes before flushing with hot water. It’s a simple, satisfying way to keep things moving without the scary fumes!
Cleaning a P Trap and Using a Plumbing Snake for Success
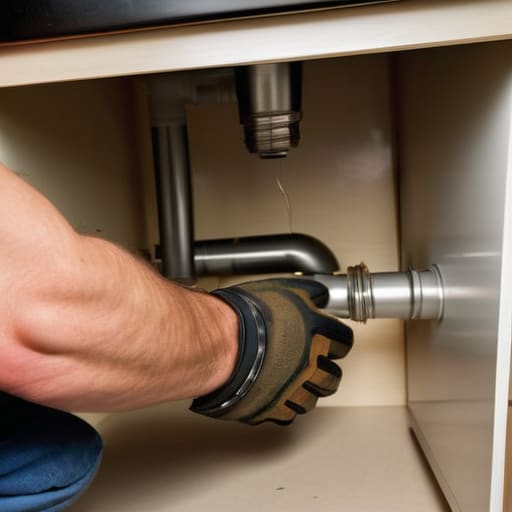
Now, if those natural remedies and plunger techniques for sinks didn’t quite do the trick, it’s time to roll up your sleeves and get a little more hands-on. Sometimes, the culprit is hiding right around the bend in your pipes. Cleaning a P-trap is one of those tasks that sounds intimidating, but I promise it’s totally doable! Just grab a bucket to catch any standing water, loosen the slip nuts under your sink, and carefully remove that U-shaped pipe. You’ll likely find a “treasure trove” of hair and soap scum sitting right there. It’s a bit messy, but seeing that water finally rush through once you’ve cleared it out is incredibly satisfying.
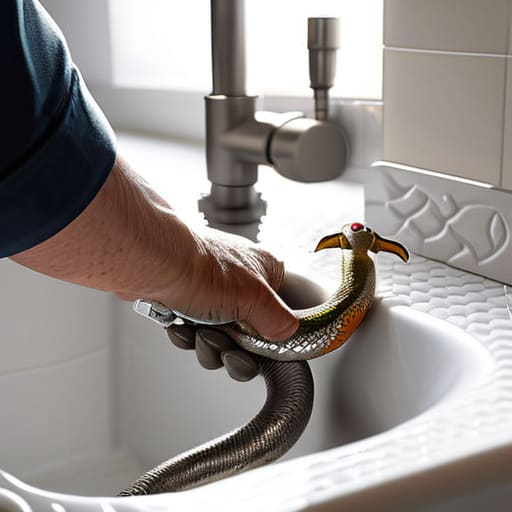
If the blockage is deeper in the wall, don’t panic—that’s where using a plumbing snake becomes your best friend. Think of it like a long, flexible finger that can reach the stubborn gunk we can’t see. Slowly feed the cable into the pipe, feeling for that moment of resistance, and give it a gentle crank to break up the clog. Once you’ve cleared the path, try to focus on preventing hair buildup in drains by using mesh strainers moving forward. It saves so much headache later!
Pro Tips from My Toolbox: Little Tricks for Big Results
- Always keep a bucket and some old rags handy before you dive in; trust me, even when you’re being careful, a little unexpected splashback is almost a rite of passage in DIY!
- Don’t go overboard with harsh chemical cleaners; they can actually eat away at your pipes over time, and I’d much rather see you use a gentle baking soda and vinegar combo that’s safe for your home and the planet.
- If you’re using a plumbing snake, remember to work slowly and feel for the resistance—it’s a conversation between you and the pipe, so don’t force it or you might cause more trouble than you’re fixing.
- Take a moment to inspect your drain stopper while you’re working; sometimes the “clog” is actually just a messy buildup of hair and soap scum stuck right under the mechanism, which is an easy fix!
- Once you think the drain is clear, run hot water for several minutes to flush out any remaining debris; it’s like giving your plumbing a little victory lap to make sure everything is flowing perfectly.
Quick Wins for a Clear Drain
Don’t rush into the heavy stuff; always start with the gentlest methods, like a good old-fashioned plunger or a natural vinegar-and-soda flush, to see if you can clear the path without a struggle.
If things are still feeling stuck, don’t be afraid to get your hands a little dirty by checking the P-trap—it’s often where the real culprit is hiding!
Patience is your best tool in the kit; if a clog is being stubborn, take a breath, switch your approach, and remember that most plumbing hiccups are totally fixable with a little persistence.
A Little Patience Goes a Long Way
“Don’t let a stubborn clog make you feel like you aren’t handy; sometimes, the most rewarding part of home maintenance isn’t just getting things flowing again, but realizing you have the tools and the grit to fix it yourself!”
Emily Carter
You've Got This: Final Thoughts on a Clear Drain
We have certainly covered a lot of ground today, from the gentle magic of natural cleaners to the more heavy-duty work of tackling that pesky P-trap or using a plumbing snake. I know that staring down a clogged sink can feel a bit overwhelming at first, but remember that most household hiccups are just a matter of having the right approach. Whether you relied on a trusty plunger or rolled up your sleeves to get a little messy with the pipes, you have successfully navigated the most common hurdles. The most important thing to keep in mind is that consistency and patience are your best friends when it comes to maintaining your home’s plumbing.
At the end of the day, these little projects are about so much more than just fixing a drain; they are about building your confidence as a homeowner. Every time you pick up a tool and solve a problem yourself, you are reclaiming your space and proving that you don’t need to be a professional to make things work. I truly believe that once you conquer a task like this, you’ll find yourself looking at your next DIY project with even more excitement. So, take a deep breath, celebrate your win, and remember: I am always here cheering you on as you build something amazing in your own home!
Frequently Asked Questions
What should I do if I've tried the plunger and the snake, but the water still won't budge?
Ugh, I know that feeling all too well—it’s so incredibly frustrating when you’ve put in the work and that water just sits there staring back at you. If the plunger and snake haven’t done the trick, we might be looking at a deeper clog in the main stack or even a venting issue. At this point, it’s time to put the tools down and call in a licensed plumber. Better to get a pro now than risk a DIY disaster!
Are there any specific types of hair or buildup that require a different approach than just a standard snake?
Oh, that is such a great question! Honestly, yes. If you’re dealing with thick, matted hair clogs—especially in a shower—a standard snake can sometimes just slide right past the “nest” without grabbing it. In those cases, I swear by a cheap plastic hair clog remover tool. They have these little barbs that actually hook the hair and pull it out. For heavy soap scum buildup, though, you’ll definitely want to stick to those enzymatic cleaners we talked about!
Is it safe to use those heavy-duty chemical cleaners from the store, or will they damage my pipes in the long run?
I get this question all the time, and honestly, I’d tread carefully! While those heavy-duty store-bought cleaners promise a quick fix, they can be super harsh. If you have older metal pipes, the intense chemicals can actually cause corrosion over time, and even with PVC, they can generate heat that might warp things. I always prefer the natural methods we talked about—they’re much kinder to your plumbing and your home!