I was sitting on my floor last Tuesday, surrounded by a literal nest of black wires behind my desk, feeling completely defeated by my own workspace. It’s that moment we’ve all had—where you look down and realize that instead of a beautiful, functional office, you’ve accidentally created a tangled disaster zone that feels impossible to clean. I used to think that a clean setup required expensive, high-end tech accessories, but honestly? That’s just not true. Through a little bit of cable management diy, you can actually reclaim your space using simple tools and a bit of creative thinking, without breaking your budget.
I’m not here to sell you some fancy, overpriced gadget that you’ll lose under your desk in a week. Instead, I want to walk you through my tried-and-true, no-nonsense methods for organizing those stubborn cords once and for all. We’re going to tackle everything from hiding power strips to labeling your connections so you never have to play “guess the plug” again. Grab your toolkit and let’s roll up our sleeves—it is time to transform this chaos into a workspace you actually love to be in!
Table of Contents
- Step-by-Step Instructions
- Creative Diy Cable Organizer Ideas for a Beautiful Space
- Hiding Computer Wires to Reclaim Your Peaceful Workspace
- Emily’s Pro-Tips for a Stress-Free Setup
- Quick Tips to Keep Your Space Beautiful and Organized
- Finding Peace in the Details
- You've Got This!
- Frequently Asked Questions
Guide Overview
Tools & Supplies
- Scissors or wire cutters for trimming ties
- Label maker or masking tape for identification
- Velcro cable ties (1 pack)
- Cable management box (1 unit)
- Adhesive cable clips (1 pack)
- J-channel or cable raceway (1 length)
Step-by-Step Instructions
- 1. Before we dive into the fun part, we need to do a little bit of “detective work.” Grab a roll of masking tape and some colorful pens, and label every single cord at both ends. There is nothing more frustrating than sitting on the floor in a tangle of black wires, wondering which one belongs to your lamp and which one is for your printer!
- 2. Now, let’s clear the slate. Unplug everything and move your desk or media console away from the wall so you have plenty of room to move. I know, I know—it feels like a huge task, but trust me, you can’t effectively organize a mess while you’re still fighting through it.
- 3. Grab a handful of velcro cable ties (I personally prefer these over plastic zip ties because they’re much more forgiving if you need to add a new device later). Start by grouping your cables together into neat bundles. Instead of having ten individual wires trailing down to the outlet, aim to create one single, organized trunk that looks much cleaner.
- 4. This is where we get creative with some DIY magic! I love using decorative wooden boxes or even repurposed vintage tins to create a “cable garage.” Simply drill a few small holes in the back or bottom of your container, tuck your power strip inside, and feed the cords through the holes. It’s a total game-changer for hiding that unsightly plastic clutter.
- 5. For those pesky wires that need to run along the edge of your desk or baseboards, let’s use some adhesive cable clips or even simple command hooks. Space them out every few inches to ensure the wires stay taut and don’t sag. A little bit of intentional routing goes a long way in making a space feel professionally designed.
- 6. If you have a lot of extra slack from longer cords, don’t just let them loop loosely on the floor. Use some spiral cable wrap or even some pretty fabric sleeves to bundle the excess. It keeps everything looking tight and intentional rather than just a pile of leftovers.
- 7. Finally, once everything is tucked away and routed, slowly plug your devices back in one by one. This is your moment to step back, grab a cup of coffee, and admire your handiwork! If a cord is peeking out where it shouldn’t, don’t sweat it—just tweak and adjust until it looks exactly how you envisioned.
Creative Diy Cable Organizer Ideas for a Beautiful Space
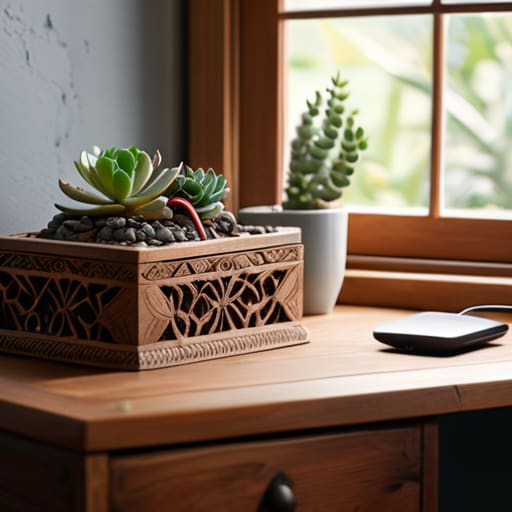
Now, if you’re feeling a little uninspired by standard plastic clips, let’s get creative! Since I spent so many years in interior design, I always tell my readers that functionality doesn’t have to look boring. One of my favorite diy cable organizer ideas involves using vintage wooden boxes or even decorative wicker baskets to house your power strips. By tucking the messy hub inside a beautiful container, you’re effectively hiding computer wires in plain sight while adding a touch of personality to your room. It turns a technical necessity into a styled decor piece!
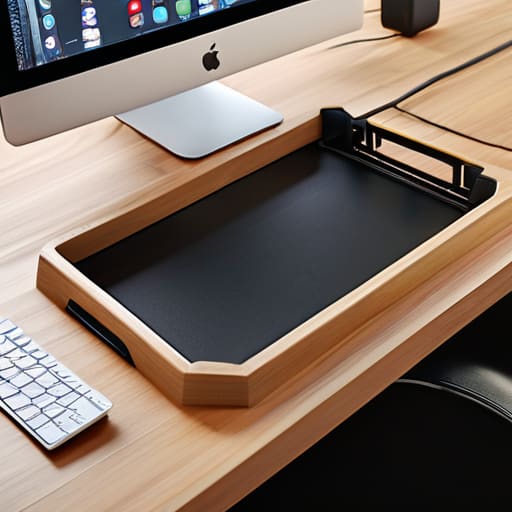
If you want to go a bit more “pro,” I highly recommend looking into under desk cable management solutions that utilize magnetic strips or even custom-built wooden trays. I once spent a whole weekend building a slim oak ledge that screwed right into the underside of my desk; it was a total game-changer for decluttering workstation wires without sacrificing any legroom. Whether you’re using a bit of woodworking or just some clever repurposing, the goal is to make your tech setup feel like a seamless part of your home’s aesthetic.
Hiding Computer Wires to Reclaim Your Peaceful Workspace
We’ve all been there: you sit down to finally crush that to-do list, but your eyes keep drifting down to that messy nest of black cords lurking under your desk. It’s hard to focus on your work when your environment feels visually loud. One of my favorite ways to find some mental clarity is through hiding computer wires completely out of sight. I always recommend starting with some simple under-desk cable management solutions, like mounting a wire tray or even a repurposed basket to the underside of your desk. By lifting those heavy power strips and bulky adapters off the floor, you instantly make your room feel larger and much more intentional.
If you’re looking for a more permanent fix, don’t underestimate the power of a clean cable raceway installation. These sleek channels can run right down the leg of your desk, making it look like the cords don’t even exist! For those of us who like to swap out gear frequently, I’m a huge fan of using velcro straps for cables instead of plastic zip ties. They are much gentler on your cords and make it a breeze to reorganize whenever you decide to move your monitor or add a new lamp.
Emily’s Pro-Tips for a Stress-Free Setup
- Label everything before you start! I learned this the hard way back in my hardware store days—grab some colorful masking tape or a label maker and mark both ends of every cord. Trust me, your future self will thank you when you aren’t playing a guessing game of “which plug belongs to the lamp?”
- Don’t forget the power strip! Instead of letting that bulky plastic block sit on the floor like a tripping hazard, try mounting it to the underside of your desk or inside a dedicated cable box. It keeps the heavy lifting out of sight and keeps your floor clear for vacuuming.
- Use Velcro ties instead of plastic zip ties. I know, zip ties are tempting because they’re cheap, but they are a total nightmare if you ever need to add a new gadget to your setup. Velcro is reusable, much gentler on your expensive cords, and way easier to adjust on the fly.
- Group your cables by “family.” I like to think of it like organizing a junk drawer—keep your power cables in one bundle and your data cables (like USB or HDMI) in another. This prevents them from getting tangled into one giant, unmanageable knot of frustration.
- Give your cords some breathing room! It’s tempting to cram every single wire into one tiny corner, but heat can actually be an issue. Make sure your power bricks and adapters have a little bit of airflow so they don’t overheat while you’re working away.
Quick Tips to Keep Your Space Beautiful and Organized
Remember, cable management isn’t just about hiding a mess—it’s about creating a calm, intentional environment where you can actually focus on your creativity!
Don’t be afraid to get a little crafty; sometimes the most functional solutions, like using vintage baskets or custom wooden boxes, are the ones that add the most personality to your room.
Take it one step at a time and don’t let a “spaghetti mess” of wires intimidate you; once you get that first bundle tucked away, you’ll feel so much more confident tackling the rest!
Finding Peace in the Details
“We often think of home improvement as big, sweeping changes like painting a wall or replacing a floor, but there is so much soul in the small stuff—like finally taming that nest of tangled wires and reclaiming the calm your workspace deserves.”
Emily Carter
You've Got This!
I know looking at a massive nest of tangled cords can feel a little overwhelming at first, but we just tackled it together! From using simple DIY organizers to tucking those pesky computer wires out of sight, we’ve covered so much ground. Remember, whether you’re opting for a sleek, hidden look or getting a little more creative with custom-built solutions, the goal is to make your space work for you rather than against you. By taking these small, intentional steps, you’ve successfully turned a source of daily frustration into a clean and organized sanctuary that actually feels like home.
At the end of the day, cable management is about so much more than just tidying up; it’s about reclaiming your peace of mind and your focus. Every time you sit down at your desk and see a clear, clutter-free surface, I want you to take a second to feel proud of what you’ve accomplished. You didn’t just move some wires around—you mastered your environment with your own two hands. So, grab your favorite screwdriver (or maybe one of my many hammers!), keep experimenting, and never forget that no project is too small to make a massive difference in your life. Let’s keep building something amazing!
Frequently Asked Questions
I'm worried about overheating—is it safe to tuck all those power strips and adapters inside a closed cable box?
That is such a smart question to ask! Honestly, I’ve been there—standing over a pile of wires, wondering if I’m accidentally creating a tiny fire hazard. Generally, it’s okay as long as you aren’t overloading the strip with high-voltage gear like space heaters. To be safe, I always pick boxes with ventilation slits and avoid stuffing them too tight. Let’s keep things organized and safe so you can DIY with total peace of mind!
What's the best way to manage cables if I'm renting and can't drill holes or use heavy-duty adhesives on the walls?
Oh, the renter’s struggle is so real! I used to deal with this constantly in my tiny apartment. Don’t worry, though—you don’t need a drill to reclaim your space. I swear by using adhesive cable clips (the kind designed for easy removal) or even just neat command hooks to guide wires along furniture edges. You can also hide everything in stylish, non-permanent cable management boxes or use weighted cord holders to keep things tidy without leaving a single mark!
How do I keep my cable organizers from looking too "industrial" or messy if I want to maintain a cozy, styled aesthetic?
Oh, I hear you! There is nothing that kills a cozy vibe faster than a bunch of black plastic conduits looking like a construction site. To keep things feeling soft and intentional, try swapping out industrial materials for something more tactile. I love using woven wicker baskets to hide power strips or even wrapping bundles in pretty jute twine. It turns a “problem” into a design detail that actually complements your beautiful, curated space!