I remember standing in the middle of my first tiny apartment, staring at these massive, soul-crushing white walls and feeling completely defeated. I had plenty of ideas, but every time I looked at high-end decor websites, I felt like I needed a professional degree or a massive inheritance just to make a space feel like home. I used to think that learning how to make wall art required expensive studio equipment or a natural-born talent for painting, but I quickly realized that’s a total myth. Growing up in my family’s hardware store, I learned early on that the most beautiful transformations usually start with just a few basic tools and a little bit of grit.
In this guide, I’m stripping away all the fancy jargon and the “designer-only” gatekeeping to show you how it’s actually done. I’ll walk you through several beginner-friendly methods—from textured canvas pieces to rustic wood accents—so you can find a style that actually fits your vibe. We aren’t just making decorations here; we are building your confidence. Grab your favorite hammer (or your glue gun!) and let’s get to work on something truly spectacular together!
Table of Contents
- Step-by-Step Instructions
- Mastering Easy Canvas Painting Techniques for Beginners
- Budget Friendly Home Decor Projects That Spark Joy
- Pro Secrets for Polished Wall Art: My Top 5 Tips
- Quick Tips to Keep Your Creative Momentum Going
- Finding Your Creative Rhythm
- Bringing Your Vision to Life
- Frequently Asked Questions
Guide Overview
Tools & Supplies
- Paintbrush (various sizes for different strokes)
- Palette knife (for texture application)
- Painter's tape (for creating clean geometric lines)
- Canvas (1 piece, medium size)
- Acrylic paint (set of multiple colors)
- Gesso (1 small jar for priming)
- Modeling paste (1 jar for 3D texture)
Step-by-Step Instructions
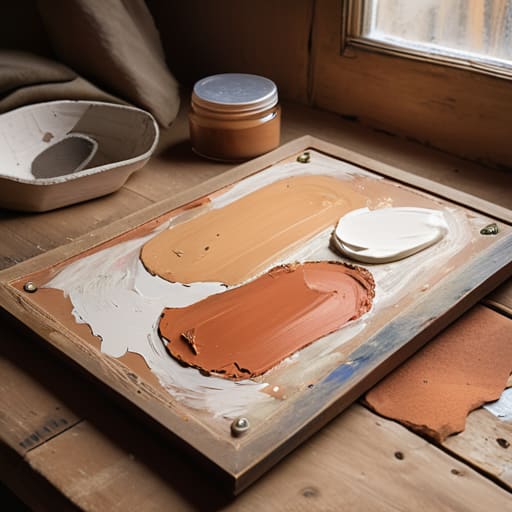
- 1. First things first, let’s talk supplies. You don’t need to head to a fancy boutique to get started; honestly, a trip to my family’s old hardware store would have been perfect for this! Grab a sturdy canvas or a piece of reclaimed wood from a local thrift shop, some high-quality acrylic paints, a few different brush sizes, and a palette. I also highly recommend picking up some painter’s tape if you’re planning on doing any sharp, geometric lines—it’s a total lifesaver for keeping things crisp.
- 2. Once you have your base ready, it’s time to prep the surface. If you’re working with wood, give it a light sanding with some fine-grit sandpaper to make sure it’s smooth to the touch. If you’re using canvas, you might want to apply a thin layer of gesso first. This ensures your paint sticks beautifully and doesn’t soak into the material in a way that makes it look muddy.
- 3. Now for the fun part: sketching out your vision! I always tell my readers to trust their gut here. You can lightly trace a design with a graphite pencil or even a piece of chalk. Don’t worry about being perfect—the beauty of handmade art is in those little organic touches that make it feel real and not like something mass-produced in a factory.
- 4. Let’s start layering that color! I like to start with my background colors first, working from the “back” to the “front.” If you’re feeling bold, don’t be afraid to mix your colors right on the palette to find that perfect, custom shade that matches your room’s vibe. Just remember to take small breaks to let the layers dry slightly so they don’t turn into a giant swirl of brown.
- 5. If you’re going for a modern, geometric look, this is where that painter’s tape comes in handy. Lay your strips down firmly, press them in well, and then paint right over the edges. When you peel them back—and this is the most satisfying part, I promise—you’ll reveal stunningly clean lines that make you look like a total pro.
- 6. Once your main design is complete, take a step back and look at the big picture. This is my favorite part of the whole process! If something feels a little “off,” you can always add a highlight with a tiny brush or even some metallic gold leaf for a bit of extra magic. If you make a mistake, don’t panic—just let it dry and paint right over it. We’ve all been there!
- 7. Finally, let’s give your masterpiece a protective finish. Once everything is completely dry, apply a coat of clear acrylic sealer or a matte varnish. This doesn’t just make the colors pop, but it also protects your hard work from dust and fading over time. Once that’s set, find the perfect spot on your wall and hang it up with pride!
Mastering Easy Canvas Painting Techniques for Beginners

Now, if you’re feeling a little intimidated by a blank white canvas, don’t panic! I remember my first time trying to paint something that didn’t look like a toddler’s finger painting—it was a total mess. One of my favorite easy canvas painting techniques is the “swipe method.” Instead of trying to be precise with a brush, grab a palette knife or even an old credit card and swipe thick layers of acrylic paint across the surface. This creates those beautiful, textured strokes you see in high-end galleries, giving you a professional look without needing years of formal training.
If you want to level up your piece, don’t be afraid to play with texture by incorporating mixed media art supplies. I love adding a bit of modeling paste or even some fine sand into my paint to create a tactile, earthy feel. It’s one of those budget friendly home decor projects that makes a huge impact; suddenly, your DIY piece looks like a custom find from a boutique. Remember, there are no mistakes here, only happy accidents and unique layers!
Budget Friendly Home Decor Projects That Spark Joy
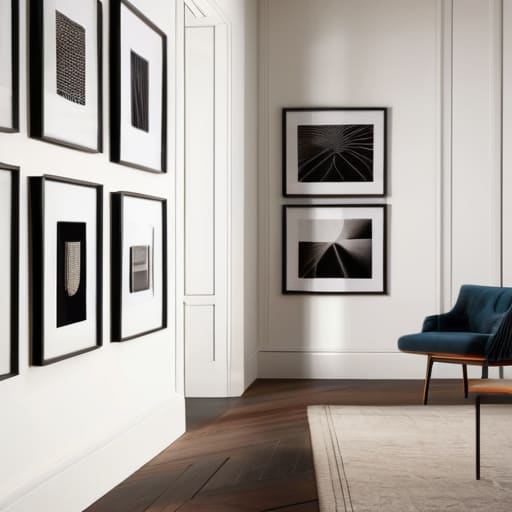
One of my favorite things about DIYing is that you don’t need a massive budget to achieve those high-end, designer looks. In fact, some of my most cherished pieces came from scouring thrift stores or even digging through my own craft bin! When you’re looking for budget friendly home decor projects, I always recommend looking at what you already have through a new lens. For instance, you can take old, mismatched frames from a garage sale, spray paint them a uniform matte black or gold, and suddenly they look like a cohesive set of modern wall art aesthetics. It’s all about that little bit of transformation magic.
If you’re feeling a bit more adventurous, I love playing with texture to add depth to a room. Instead of buying expensive sculptural pieces, try experimenting with mixed media art supplies like dried botanicals, textured fabric scraps, or even some modeling paste on a canvas. These small, tactile additions can turn a simple project into a conversation starter. Remember, the goal isn’t perfection; it’s about creating something that feels uniquely yours and brings a smile to your face every time you walk past it!
Pro Secrets for Polished Wall Art: My Top 5 Tips
- Don’t be afraid to play with texture! I always say that a little bit of dimension goes a long way. Whether you’re mixing in some sand into your acrylics or layering pieces of fabric, adding that tactile element makes your piece look much more high-end and intentional.
- Measure twice, hang once! There is nothing more frustrating than finishing a gorgeous piece only to realize it’s way too small for the space. Before you even pick up a brush, use some painter’s tape to outline the dimensions on your wall so you can see exactly how it feels in the room.
- Embrace the “ugly” stage. Every single one of my projects goes through a phase where I look at it and think, “Emily, what have you done?” Trust the process! Sometimes you just need to step away, grab a cup of coffee, and come back with fresh eyes to see how the colors are actually blending.
- Think about your lighting. Since I spent years in interior design, I can tell you that the way light hits your art changes everything. If you have a piece with a lot of texture, try placing it near a lamp or a window to create those beautiful, dramatic shadows that really make the art pop.
- Keep your color palette cohesive. You don’t have to stick to just one color, but try to pull a few shades from your existing room decor. It makes the wall art feel like it was always meant to be there, rather than something just tacked on at the last minute.
Quick Tips to Keep Your Creative Momentum Going
Don’t sweat the perfection—the most beautiful pieces often come from those little “happy accidents” that happen while you’re experimenting with texture and color.
Always keep your workspace organized and your favorite tools handy; honestly, having a dedicated little nook makes the whole process so much more relaxing and fun!
Start small and build your confidence with simple projects before diving into the massive, intimidating pieces, because every pro was once a beginner just like us.
Finding Your Creative Rhythm
“Don’t let the fear of a blank canvas hold you back; wall art isn’t about achieving perfection, it’s about pouring a little piece of your soul into your home and watching your space come to life.”
Emily Carter
Bringing Your Vision to Life
We have covered so much ground today, from mastering those foundational canvas techniques to finding ways to keep your budget intact while still achieving that high-end designer look. Whether you decided to dive into a textured painting project or opted for a more structured, mixed-media approach, the most important thing is that you moved from thinking about decorating to actually doing it. Remember, the secret to great wall art isn’t about having a perfectly curated studio or the most expensive supplies; it’s about experimenting with different mediums and finding that specific style that makes your house truly feel like a home.
As you hang your finished pieces and step back to admire your handiwork, I want you to remember one thing: perfection is overrated. There might be a stray brushstroke or a slightly uneven edge, but those are actually the marks of a handmade soul that mass-produced decor simply can’t replicate. Every time I look at a piece I’ve restored or created, I don’t just see art; I see the hours of patience and the growth in my own skills. So, grab your tools, trust your instincts, and keep creating something beautiful. I can’t wait to hear which project you tackled first!
Frequently Asked Questions
I’m a bit worried about the mess—what’s the best way to protect my floors and furniture while I'm working on these projects?
Oh, I totally hear you! Trust me, growing up in my dad’s hardware store, I learned the hard way that a little bit of prep work saves a massive headache later. My golden rule? Always layer up. Start with a heavy-duty canvas drop cloth for the floor—it catches everything from paint drips to sawdust—and then toss a lightweight plastic sheet over your furniture. It keeps the chaos contained so you can focus on the fun part!
What kind of mounting hardware should I use so my new art doesn't end up damaging my drywall?
Oh, I am so glad you asked! There is nothing more heartbreaking than finishing a gorgeous piece only to see a huge hole in your drywall. For lighter pieces, those tiny brass picture hangers are a lifesaver. But if you’re hanging something a bit more substantial, please skip the nails and grab some screw-in drywall anchors. They distribute the weight much better and keep your walls looking pristine. Let’s protect that beautiful work!
If I'm working with a really tight budget, are there specific materials you recommend that look high-end but won't break the bank?
Oh, I have been there! Growing up in my family’s hardware store, I learned early on that you don’t need a massive budget to get a high-end look. I’m a huge fan of using textured plaster or even joint compound over cheap canvases to create that expensive, sculptural feel. Also, don’t sleep on thrifted frames! A quick coat of matte black spray paint can make a $2 find look like a designer masterpiece.