I remember standing in my parents’ hardware store back in Ohio, watching my dad effortlessly notch wood for a custom garden gate, and thinking there was no way I’d ever be that confident with a saw. For the longest time, I believed that learning how to build a garden trellis required a professional workshop and a mountain of expensive, specialized tools. But honestly? That is a total myth. You don’t need a degree in carpentry or a garage full of heavy machinery to give your climbing roses a beautiful place to call home; all you really need is a bit of patience and a few basic supplies you probably already have tucked away in your shed.
In this guide, I’m stripping away all the complicated jargon to give you a straightforward, no-nonsense plan that actually works. I’ll walk you through selecting the right materials, making simple cuts, and assembling a sturdy structure that looks like it came straight from a high-end boutique garden center. Whether you’re a seasoned DIYer or you’re picking up a hammer for the very first time, we are going to build something amazing together that will make your garden absolutely glow!
Table of Contents
- Step-by-Step Instructions
- Finding Inspiration Through Creative Wooden Trellis Design Ideas
- Gathering Your Garden Trellis Materials List for Success
- Pro-Tips from My Toolbox: Making Your Trellis Last
- Quick Tips for Your Trellis Success
- A Little Encouragement for Your Garden Journey
- Bringing Your Vision to Life
- Frequently Asked Questions
Guide Overview
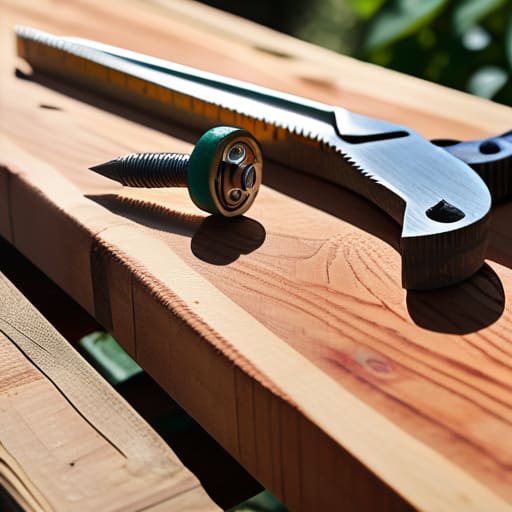
Tools & Supplies
- Measuring tape for marking wood lengths
- Hand saw or miter saw for cutting pieces
- Drill with bits for making pilot holes
- Screwdriver or drill driver for fastening
- Untreated cedar or redwood stakes (4-5 pieces)
- Garden twine or wire (1 roll)
- Wood screws (1 small box)
- Garden staples or small nails (1 small pack)
Step-by-Step Instructions
- 1. First things first, we need to head to the hardware store—or your local lumber yard—to grab our supplies. I recommend picking up some untreated cedar or redwood because they are naturally resistant to rot, which is a total lifesaver when you’re working outdoors. You’ll also need a box of exterior-grade screws, a drill, a saw (a miter saw is great, but a simple hand saw works too!), and some garden twine or wire to help your plants find their way.
- 2. Once you’re back in your workspace, it’s time to get those pieces cut to size. For a standard trellis, I like to cut two long vertical posts (about 6 feet tall) and several shorter horizontal slats. Don’t sweat the small stuff if your cuts aren’t perfectly straight—the beauty of a DIY project is that little imperfections actually give it that charming, rustic character we all love!
- 3. Now, let’s start assembling the frame. Lay your two long vertical posts on a flat surface and position your horizontal slats across them to create a ladder-like pattern. I usually space them about 8 to 12 inches apart, depending on how much room your specific plants need to grow. Use your drill to pre-drill small pilot holes first; this is a pro tip that prevents your wood from splitting when you drive the screws in.
- 4. Once the main frame is sturdy, it’s time to add some extra support. If you’re planning on growing something heavy, like climbing roses or even some juicy heirloom tomatoes, I highly recommend weaving some thin wire or sturdy garden twine in a crisscross pattern across the slats. This creates a much more secure “web” for the tendrils to grab onto as they climb.
- 5. Before we head out to the garden, let’s give the wood a little love. If you want that trellis to last for years, apply a quick coat of eco-friendly, non-toxic wood sealer. I personally love using a clear matte finish because it protects the wood without hiding that gorgeous, natural grain that makes garden structures look so high-end.
- 6. Finally, it’s time for the most rewarding part: installation! Depending on where you want it, you can either stake the vertical posts directly into the soil or secure the trellis to a fence or wall using heavy-duty brackets. Make sure it’s sturdy and upright before you let your plants loose, and then sit back with a cold drink and watch your garden transform!
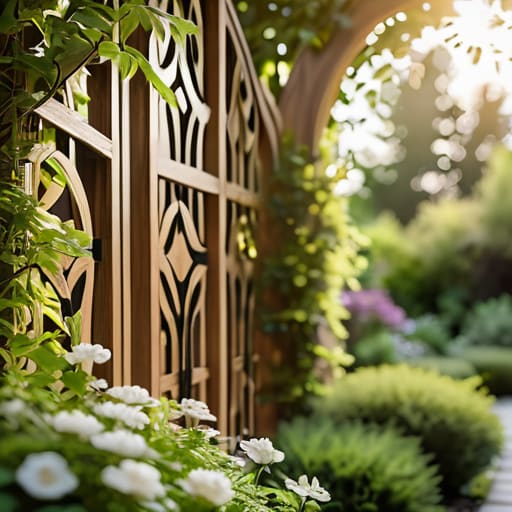
Finding Inspiration Through Creative Wooden Trellis Design Ideas
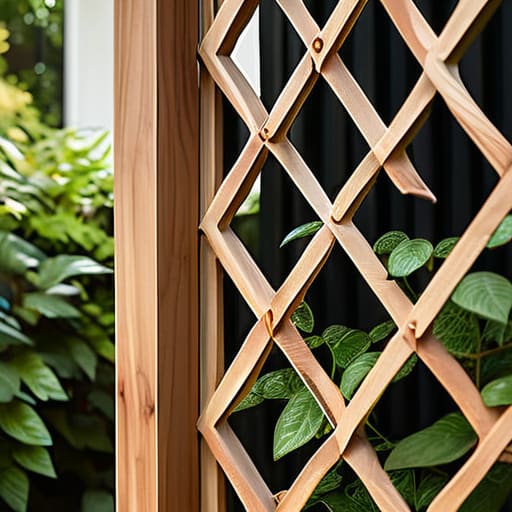
Before you grab your saw and head to the hardware store, I love to spend a little time just dreaming about what’s possible. When I’m looking for wooden trellis design ideas, I don’t just think about function; I think about how the structure will complement the soul of my garden. You could go for something classic and geometric, like a traditional diamond lattice, or get a little more whimsical with organic, sweeping curves that mimic the natural movement of your vines. Since I grew up around my family’s hardware store, I’ve learned that the beauty often lies in the details—like choosing a specific wood grain or adding a decorative finial to the top.
If you’re working with a smaller space, like a balcony or a tiny courtyard, don’t overlook vertical gardening solutions. Sometimes, a simple, slim frame leaning against a wall can turn a boring brick surface into a lush, living tapestry. Whether you’re building something massive to support heavy wisteria or a delicate structure for sweet peas, let your imagination run wild. Remember, there are no wrong answers in gardening—only opportunities to create something unique!
Gathering Your Garden Trellis Materials List for Success
Before we grab our tools and get to work, let’s talk about the most important part of any project: the prep work. I always tell my readers that a successful build starts long before the first nail is driven. Having a solid garden trellis materials list ready to go will save you those frustrating mid-project trips back to the hardware store—and trust me, we’ve all been there! Since I grew up in my family’s hardware store, I learned early on that quality matters. For these easy DIY garden structures, I highly recommend choosing rot-resistant wood like cedar or redwood. It might cost a tiny bit more upfront, but it means your beautiful creation won’t crumble after one rainy season.
As you’re gathering your supplies, don’t forget the little things that make a big difference in your vertical gardening solutions. I like to keep a stash of galvanized screws and outdoor-rated wood glue on hand to ensure everything stays sturdy once your vines start climbing. Also, if you’re planning on something more intricate, make sure you have a reliable level and a sharp measuring tape. Getting your measurements right the first time is the secret to a professional-looking finish!
Pro-Tips from My Toolbox: Making Your Trellis Last
- Don’t skimp on the wood quality! Since this beauty is going to be living outdoors, I always recommend using cedar or redwood. They have a natural resistance to rot and insects, which means you won’t be rebuilding your hard work from scratch next season.
- Mind the moisture! One of my biggest mistakes early on was forgetting to seal the wood. Make sure you apply a good quality, non-toxic exterior stain or sealant to every nook and cranny before you head out to the garden. It keeps the wood looking fresh and prevents it from warping.
- Give your plants some breathing room. When you’re deciding on the spacing of your lattice or slats, think about the specific plant you’re growing. Heavy climbers like wisteria need a really sturdy frame, while delicate sweet peas might just need a little more airflow.
- Stability is everything. There is nothing more heartbreaking than seeing your beautiful trellis tip over mid-summer! I like to use sturdy wooden stakes or even a little bit of rebar driven deep into the ground to anchor the base. It gives you that extra peace of mind when the wind picks up.
- Plan for growth! It’s tempting to build something small and cute, but plants have a way of outgrowing their space faster than you’d think. I always suggest building a trellis slightly larger than you think you’ll need—trust me, your future self (and your climbing roses) will thank you!
Quick Tips for Your Trellis Success
Don’t be afraid to let your creativity run wild! Whether you’re going for a classic look or something a bit more whimsical, your trellis is a chance to add a personal touch to your garden.
Take your time with the measurements. I know it’s tempting to jump straight into the sawing, but a little extra patience during the planning phase will save you so much heartache (and extra trips to the hardware store!) later on.
Remember that it’s okay if things aren’t perfectly level on the first try. Gardening is all about growth, and your DIY projects are the same—just keep tweaking, learning, and enjoying the process of building something with your own two hands!
A Little Encouragement for Your Garden Journey
“Building a trellis isn’t just about giving your climbing roses a place to grow; it’s about the magic of seeing a simple pile of wood transform into a living piece of art that you built with your own two hands.”
Emily Carter
Bringing Your Vision to Life
And just like that, you’ve gone from a pile of lumber to a stunning centerpiece for your garden! We’ve covered everything from selecting the perfect wood to choosing a design that matches your unique style, and hopefully, you feel much more confident about the process now. Remember, the secret to a successful build isn’t about having a perfect workshop; it’s about having the right materials and a little bit of patience while you work through those assembly steps. Whether you opted for a classic arched design or something a bit more modern and geometric, you’ve successfully created a functional piece of art that will support your climbing vines and flowers for seasons to come.
As you step back to admire your handiwork, I want you to take a second to really soak in that feeling of accomplishment. There is something so incredibly special about looking at a corner of your yard and knowing, “I made that.” It might feel like just a simple trellis right now, but it’s actually a testament to your growing skills and your willingness to try something new. Don’t be afraid to keep experimenting, keep getting your hands a little dirty, and most importantly, keep building amazing things! I can’t wait to see how your garden transforms—happy planting, friends!
Frequently Asked Questions
What kind of wood should I use if I want my trellis to last for several years without rotting in the rain?
That is such a great question! Since your trellis is going to be living out in the elements, you definitely want to pick a wood that can handle the moisture. I always recommend going with cedar or redwood; they have natural oils that act like a built-in shield against rot and bugs. If those are a bit out of your budget, pressure-treated pine is a solid, affordable alternative that’ll hold up beautifully for years!
Is it better to secure my trellis directly into the ground, or should I look into using heavy planters or stakes instead?
That is such a great question! Honestly, it really depends on your garden setup. If you’re working with a permanent flower bed, securing it directly into the ground offers the most stability for heavy climbers. But, if you’re a renter or want to play around with different layouts, I’m a huge fan of using heavy planters! It gives you that lovely flexibility to move your greenery around whenever inspiration strikes.
How much weight can a DIY trellis actually hold before it starts to lean or break under the weight of heavy climbing vines?
That is such a great question! Honestly, it depends on how you build it. If you’re using thin bamboo stakes, a heavy vine like wisteria will eventually knock it over. But, if you use sturdy 2×2 cedar or pressure-treated wood and secure the base firmly into the ground, you can support quite a bit! Just remember: the heavier the plant, the more “bones” your trellis needs to stay upright and beautiful.