I still remember standing in my very first apartment, staring at a plain, beige kitchen wall and feeling completely intimidated by the thought of a tile saw. I kept telling myself that learning how to tile a backsplash was a job strictly reserved for licensed contractors with fancy vans and even fancier tools. But honestly? That’s just a myth that keeps so many of us from actually improving our homes. Growing up in my family’s hardware store, I learned early on that most “expert” tasks are really just a series of small, manageable steps—you just need the right mindset (and maybe a really good hammer) to get through them.
In this guide, I’m stripping away all the intimidating jargon to give you the real, no-nonsense truth about the process. I’ll walk you through everything from prepping your counters to getting those grout lines perfectly straight, without any of the expensive professional fluff. Whether you’re looking to refresh a rental or finally tackle that dream kitchen renovation, I promise we’ll do this together, one tile at a time. Let’s stop dreaming about that beautiful kitchen and start building it!
Table of Contents
- Step-by-Step Instructions
- Mastering Your Backsplash Layout Planning and Essential Tiling Tools List
- Pro Tile Adhesive Application Tips and Preventing Tile Misalignment
- My Secret Sauce: 5 Pro Tips for a Flawless Finish
- Quick Wins for Your Backsplash Success
- A Little Piece of Advice from My Workbench
- You Did It! Your Kitchen Transformation is Complete
- Frequently Asked Questions
Guide Overview
Tools & Supplies
- Tile cutter or wet saw for precision cuts
- Notched trowel for applying adhesive
- Rubber grout float for spreading grout
- Spacers to maintain even gaps
- Backsplash tiles (approx. 10-15% extra for waste)
- Tile adhesive or mastic
- Grout (matching color preference)
- Tile sealant or sealer
Step-by-Step Instructions
- 1. First things first, we need to get that surface ready for its big debut. Grab a degreaser or even just some warm, soapy water and give your walls a really thorough cleaning. Any lingering grease from cooking can prevent the adhesive from sticking, and we definitely don’t want your beautiful new tiles sliding down the wall next week! Once it’s clean, make sure the area is completely dry before moving on.
- 2. Now, let’s talk layout—this is where the magic (and the math) happens. Before you even touch the mortar, lay your tiles out on your countertop or a flat surface to see how they fit. I always like to dry-fit a few rows to see where the cuts will fall. You don’t want to end up with a tiny, awkward sliver of tile in a visible corner, so plan your starting point so the layout looks perfectly balanced.
- 3. Time to get a little messy with the thin-set! Using a notched trowel, spread a layer of tile adhesive onto a small section of the wall. You’ll want to create even ridges with the trowel, which helps the tile grab onto the wall properly. My biggest tip? Don’t spread too much at once; if you cover the whole wall, the adhesive might start to skin over and dry out before you’ve even placed your first tile.
- 4. Now, carefully press your tiles into the thin-set. Use a gentle, twisting motion to ensure they are fully seated and level. As you go, grab a spirit level to check your progress frequently. It’s so easy to get carried away and accidentally let things tilt, but a little extra checking now will save you a massive headache once the grout goes in!
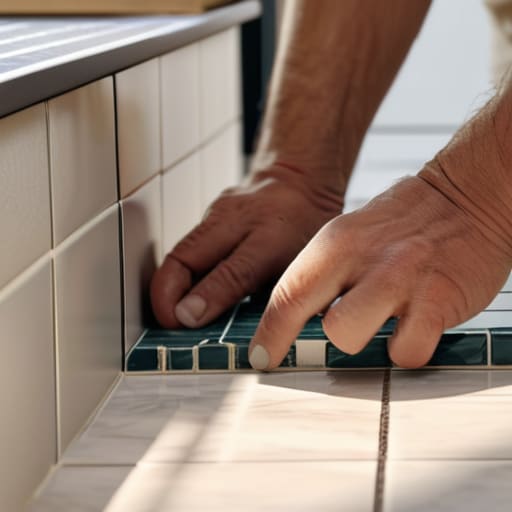
- 5. If you have gaps between your tiles, don’t panic—that’s exactly what spacers are for! I love using those little plastic cross-shaped spacers to keep my grout lines consistent. They act like tiny little guides that ensure every single tile stays in its proper place. Just make sure you tuck them in tight so they don’t shift while the adhesive is setting.
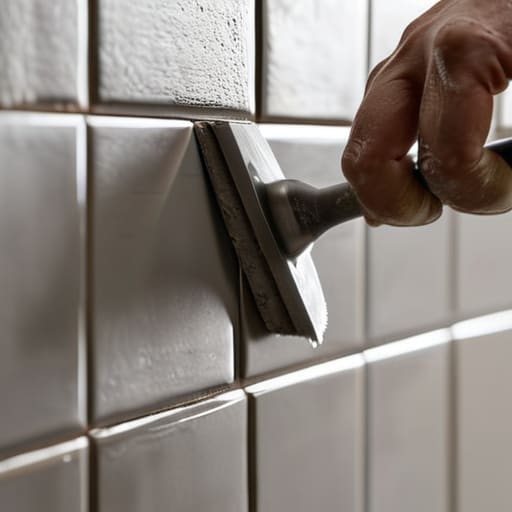
- 6. Once your tiles are all set and the adhesive has had a chance to cure (usually 24 hours), it’s time for the most satisfying part: grouting! Mix your grout to a peanut butter consistency and use a rubber grout float to smear it into the joints. Work in small sections and make sure you’re pressing it deep into those crevices. When you’re done, take a slightly damp sponge and gently wipe away the excess from the tile surfaces.
- 7. Finally, let’s give it a little polish! After the grout has dried, there might be a thin, hazy film left on the tiles. Take a clean, microfiber cloth and buff the tiles until they shine. Take a second to step back, grab a cup of coffee, and admire your hard work. You just transformed your kitchen, and you did it all yourself!
Mastering Your Backsplash Layout Planning and Essential Tiling Tools List
Before you even touch a single tile, we need to talk about the “secret sauce” of a professional-looking finish: backsplash layout planning. I always tell my readers to start by mapping everything out on the counter first. Grab a few tiles and dry-lay them to see how the pattern flows around your outlets and where the cuts will land. You really want to avoid those tiny, awkward slivers of tile at the corners, as they can make even the most beautiful project look a bit wonky. A little bit of prep work now is the absolute best way to ensure you’re preventing tile misalignment later on.
To make sure you aren’t running to the hardware store halfway through the job, I’ve put together a quick essential tiling tools list for you. Beyond the obvious hammer and trowel, make sure you have a high-quality tile cutter and a level that you actually trust! Since I grew up around my family’s hardware store, I learned early on that having the right tool for the specific task—like a specialized nipper for those tricky edges—makes the whole process so much more enjoyable. Trust me, having the right gear makes all the difference!
Pro Tile Adhesive Application Tips and Preventing Tile Misalignment
Now, let’s talk about the “glue” that holds your whole vision together! One of my biggest pieces of advice when it comes to tile adhesive application tips is to never, ever try to spread too much thin-set at once. I know it’s tempting to get a huge section covered so you can move faster, but the adhesive can actually start to skin over and lose its grip if it sits too long. Instead, work in small, manageable batches. I always recommend using a notched trowel to create consistent ridges; those little grooves are what ensure your tiles stay firmly seated and don’t slide down your wall halfway through the project.
To tackle the headache of preventing tile misalignment, you absolutely have to embrace the power of spacers. I used to think I had a steady enough hand to wing it, but trust me, even a tiny slip can throw off your entire pattern by the time you reach the corner. Using spacers keeps your grout lines looking crisp and professional. If you find a tile is sitting a little higher than the others, don’t panic! Just give it a gentle tap with a rubber mallet to level it out before the adhesive sets.
My Secret Sauce: 5 Pro Tips for a Flawless Finish
- Don’t skip the “dry lay” phase! Before you even touch that adhesive, lay your tiles out on the counter exactly how you want them. It’s the best way to catch awkward slivers or weird gaps before they become permanent mistakes.
- Keep your grout sponge damp, not soaking wet. I learned the hard way that if your sponge is too saturated, you’ll actually wash the pigment right out of your grout, leaving you with a patchy, uneven look.
- Grab a bucket of clean water and a microfiber cloth to wipe your tiles frequently while grouting. If you let the grout haze build up too thick, it can be a total nightmare to scrub off once it fully cures.
- Use spacers—and I mean really use them. Even if you have steady hands, those tiny little plastic crosses are your best friends for ensuring every single line stays perfectly straight and consistent.
- Embrace the imperfection! If a tile is just a hair off, don’t panic and tear the whole wall down. Sometimes a little bit of character is better than a stressful afternoon of perfectionism, so just take a breath and keep moving forward.
Quick Wins for Your Backsplash Success
Take your time with the layout before you even touch the adhesive; a little extra planning prevents a lot of messy corrections later!
Don’t rush the application—applying your thin-set in small, manageable sections ensures your tiles stay exactly where you want them.
Remember that mistakes are just part of the process, so keep a steady hand, stay patient, and trust that you’re building something beautiful!
A Little Piece of Advice from My Workbench
“When you’re staring at a pile of tiles and a blank wall, it’s easy to feel a little overwhelmed—but remember, every stunning backsplash started with just one single tile. Don’t aim for perfection on your first try; aim for progress, and trust the process!”
Emily Carter
You Did It! Your Kitchen Transformation is Complete

Now that the grout has dried and the dust has finally settled, take a moment to step back and really look at what you’ve achieved. We’ve covered a lot of ground together, from the initial meticulous layout planning to the tricky business of applying adhesive without making a mess. Remember, those little imperfections aren’t flaws; they are the hallmarks of a project that was actually made by hand. By mastering your spacing and keeping a steady hand during the application, you’ve ensured that your new backsplash isn’t just a decorative layer, but a durable centerpiece that will stand the test of time in your home.
If you felt a little nervous when we first started, I want you to know that those jitters are completely normal. Even with my background in design, I still get a little flutter of excitement (and a tiny bit of stress!) every time I start a new tiling project. But seeing that finished product—the way the light hits the new texture and how it completely changes the vibe of your kitchen—makes every bit of effort worth it. I truly believe that you have the power to reshape your world, one tile at a time. So, grab a coffee, admire your hard work, and get ready for your next big project. Let’s keep building something amazing together!
Frequently Asked Questions
How do I know if my kitchen walls are too uneven to start tiling, and what should I do if they are?
Oh, I am so glad you asked! This is one of those “measure twice, cut once” moments. Grab a long level or a straight edge and hold it against your wall; if you see big gaps or light peeking through, you’ve got some unevenness to tackle. Don’t panic, though! You can usually smooth things over with a little bit of joint compound or by using a thicker layer of mortar to level things out before you start laying those tiles.
Should I use unsanded or sanded grout for my backsplash, and how do I avoid staining my grout lines?
This is such a common question, and honestly, getting the grout right is what makes a backsplash look truly professional! For most backsplashes, you’ll want to use unsanded grout, especially if you’re using delicate tiles or have those tiny, narrow grout lines. To avoid those dreaded stains, the trick is to wipe away excess grout quickly with a damp (not soaking!) sponge. Don’t let it sit too long, or it’ll bake right in!
What's the best way to cut tiles around tricky spots like electrical outlets or uneven corners?
Oh, the dreaded outlet cuts! Don’t let them intimidate you—we’ve all been there. For those tricky electrical boxes, I swear by a tile nipper for small adjustments, but for clean, professional lines, a wet saw or a diamond blade tile saw is your best friend. If you’re dealing with uneven corners, take your time with a manual tile cutter. Just remember: measure twice, cut once, and always keep a little extra tile on hand for those “oops” moments!